Hey guys! I'm guest posting over at Close to Home today sharing a fun Father's Day craft to do with your kids. I hope you enjoy it!
Go on over and show some love! Click here to check it out!

Cloth diapering, co-sleeping, baby wearing, crafty mom to two girls on the autism spectrum. My adventures from everything from crafts to autism, to everything in between.
Thursday, May 31, 2012
Wednesday, May 30, 2012
Fathers Day tradition
So not gonna lie, I actually did this project almost a year ago to do a post, but my morning sickness got the better of me and I never wrote it. But I figured I have the pictures and I might as well do it now!
So every year Morgen asks for the same thing for Valentines day, Fathers day and his birthday. Whats that? Chocolate covered yummies in his pot. the pot in question is a terra-cotta pot I got on clearance at Michaels Crafts a few years ago for $.50 and painted. I sponge painted it white then cut sponges in the shapes of harts and did red and pink hearts on it. Morgen loves this pot. It has a special prominent place on his desk. He loves it so much because he knows 3 times a year it will be filled with chocolate goodies.

To start off I get strawberries, a whole pineapple, mango, kiwi, a cantaloupe, and a bag of marshmallows, also depending on the time of year I get blackberries. I wash and dry the fruit, then I stick the strawberries and marshmallows on sticks. the pineapple i cut the outer layer off and stick on sticks as well, I've tried different ways with the pineapple and spears seem to work the best, but the time I did these ones I was trying to make flowers, it didn't work out that well. I peal the mango and kiwi and slice them and put them on sticks, the cantaloupe i cut in half and then used a mellon baller to make balls and put multiple balls on sticks.


The mellon, mango, blackberries and kiwi will not be dipped in chocolate as they are just too delicate, they are used more for color and to space out the chocolate coma my husband will endure from eating the entire thing in less than 24 hours. =)
In the pot I put a half a styrofoam ball that I cut down to fit, you can cover the ball with green tissue paper or green leaf lettuce, sometimes I do, sometimes, like when i took these pictures and was pregnant I didn't care and left the styrofoam showing. Morgen didn't care as long as he got his goodies.
So first things first, I boil water in a pot and put a double boiler over it. Pour a bag of chocolate chips in and stir till melted. Make sure no water gets into the chocolate. This project usually takes me two bags of Hershey's dark chocolate chips.


Then take the strawberries on sticks and cover in chocolate.

Lay the strawberries on parchment paper to dry. I usually stick the parchment paper on top of a baking sheet so I can move them more easily.

Repeat with the marshmallows and anything else you want to dip. for the marshmallows I tend to put two or three on a stick and cover them all at once,

Then once the chocolate is set I start arranging in the pot. (usually i wait until they were hardened. I was pregnant and impatient at the time these pictures were taken so I just shoved them in)


These next pictures were from a few years ago when I did it, they looked much nicer because I waited until the chocolate was set. Also hearts are easier to cut into pineapple than flowers. =)


As you can see Tabitha was eyeing daddies yummies!
Its always wise to keep some extra fruit on hand when making these to keep the little ones from rioting.

Its Tabitha approved!
Monday, May 28, 2012
What? You want to eat?
Ever have one of those days where you are running around, doing so much you forget you have to make dinner? Yea happens to me all the time. And sine we are on a very strict budget, getting pizza or chinese take out isn't in the cards when I forget about dinner.
It happened again the other night, I was sewing while Tabitha was at school and Eva was actually sleeping for once during that time. So when Tabitha got home I started cleaning and playing with her and the next thing I knew it was already 6pm! Yeiks, dinner should already be on the table by then and Tabitha's attitude was letting me know it. So I ran into the kitchen to see what I cold make, I looked at the dinner calender and realize there was no way I had the 1 1/2 hours I would need to cook that nights dinner, so off to the pantry I go.
It had been a few weeks since I did major grocery shopping (I do my major shopping trip at the beginning of the month and then do small trips for fresh veggies, milk and bread through the month) and the pantry was looking a little bare.
Here's what I had:
crackers, Tabitha's box of random snack stuff, diced tomatoes with sweet onions, olives, different kinds of pasta, black beans, canned mushrooms, and chili.
So I threw some(a large bag) tri color rotini in to boil, and once it was cooked and drained i put it back in the pot. I threw in two cans of tomatoes with sweet onions (drained), 1 can of sliced mushrooms (drained) and a can of olives (drained).
Morgen had 3rds, Tabitha who rarely finishes her dinner had 2nds! It also made enough that I was able to split it up into containers for Morgen to take to school for two days worth of lunches! I added some salt and pepper to it as well and it was darn good for a 15 minute dinner!

Using up leftovers
So every Sunday I cook a whole chicken in the crockpot, we have church from 1:30 to 4:30 so I don't want to come home around 5 and have to quickly throw something together. Usually all I have to do is cook some rice and make a salad and rolls and we are good to eat by 6 at the latest. But ever Sunday we have at least half a chicken left over so on Monday's I try to come up with a good way to use the left over chicken.
So this last Monday I made a very yummy dish.
Bow tie pasta with asparagus and chicken
I boiled a bag of bow tie pasta and put the steamer basket in the top of the pot. I put in half a bunch of asparagus and let it steam with the pasta.
When the pasta was cooked I drained it, and cut up the asparagus and mixed them together. I heated up the left over chicken (that weeks marinade was a lemon garlic so it went really well with the pasta) and shredded it into the pasta. After I served Tabitha hers i sprinkled some crushed red pepper flakes in and mixed it up. it was really yummy, Morgen had 3rds =)

Saturday, May 26, 2012
Getting Crafty Weekend Link up
So, I took my sewing machine in to be fixed today. Paid $50 got it home, only for it to break again less than an hour after starting. I'm gonna cry. I'm already going through sewing withdrawals, not to mention the extreme number of sewing projects I have to finish in the next week! So to help with my sewing withdrawals I've been scouring pintrest for some inspiration on non sewing projects.
Here are some of my favorites:


Next week I will feature some of my favorite posts so hurry and link up!
Just FYI, Its my first time using linky tools, so I chose the wrong kind of linky. oops! next week i'll use the thumbnail one and you will be able to see pictures!
Here are some of my favorites:
This was on Zulily.com but I can't find who originally made it. So super cute and Tabitha LOVES peacocks so I will definitely be making some of these this week.

This adorable mobile from WhiMSy love Uses a sewing machine but could easily be sewn by hand.
Birth Announcement Wall Hanging from Etsy, I've been meaning to do these for the girls for a while now.
Wouldn't these be adorable in Pink and Purple? Free pattern on Ravelry.
I just love these little flowers. So sweet. Unfortunately it was an upload by user so I don't know where it came from, but super adorable, I love the colors.
So Now that I can't sew for a while, I'm going to live vicariously through you!
Welcome to my first Getting Crafty Weekend Link Up Party!
So for the Rules: (Every party needs rules, otherwise they end with the cops at your door. Maybe that was just the parties from college, oh well)
1. The project, tutorial, whatever you link up must be made by you.
2. Please grab my button and put it in your post or side bar so others can join the fun. Because what fun is a party with no one there?
Next week I will feature some of my favorite posts so hurry and link up!
Just FYI, Its my first time using linky tools, so I chose the wrong kind of linky. oops! next week i'll use the thumbnail one and you will be able to see pictures!
Friday, May 25, 2012
My plans went...
CLUNK! That my dear friends is the sound my sewing machine made before it started beeping like crazy and the screen said "Stop for SAFTEY purposes". Why oh Why does my sewing machine have it out for me? The same thing is happening as has happened oh probably about 10 times in the 5 years I've owned my sewing machine. This same problem always seems to pop up at the worst times. The first time, was 3 weeks before christmas, I got my machine back 2 days before christmas and had to sew like crazy for 36 hours with only hot chocolate to help me through. Then again when I was making some dresses for My sister's baby shower. My machine clunk, clunk, clunked to a halt in the middle of a zipper. The last time it did this was when I was a contestant on One Month to Win It. I had luckily mostly finished my project for the week and was able to hand sew the rest and get my machine fixed soon after (although I got eliminated that week, but oh well). This time, I have a list a mile long and my sewing time is when Tabitha is at pre-school and after the girls go to bed. A few nights ago I was working on a new dress that I plan to make a tutorial for, and I'm sending it as a prize for an upcoming giveaway (i'll let you all know when the giveaway is), I also have my own giveaway going on for a custom dress and two soft racer packs and as I was sewing the dress, clunk, Clunk, CLUNK, BEEEEEPPPPPPP!!!!!!
And I went "NO!" I may have been a little loud and accidentally woken up Eva with that NO!, but she was a trooper and went right back to sleep. So tomorrow bright and early I will be waiting at Porters with my sewing machine praying that that awesome man can fix my sewing machine.
In the meantime, I've been going through the pictures for the Grace tutorial which I never actually got around to writing, yea, Morgen is not going to be my paparazzi anymore. I love him but he took so many pictures of random stuff from strange angles that I'm having a hard time following it and I made the dress up! I'm going to go through the pictures and try to write it out then make a new Grace Dress with a very detailed tutorial. This dress is not simple and took me over a week to complete, so I'm thinking I'm going to make it a Sew-A-Long. So look for that in June. Hope you all have a wonderful Memorial Day weekend. And So that I don't leave everyone with the sad tummy ache feeling I've had over my sewing withdrawals, I'll leave you with some Eva cuteness, because looking at her adorable face makes everything better.

Thursday, May 24, 2012
Winner of the Kindle Fire!

The winner of the Kindle Fire is.......entry number #157,760 put in by
**********REGINA MALLOY! *****************
Regina's method of entry will be verified, if it is not valid a new winner will be selected. Regina, I just sent you an email you have 24 hours to respond or a new winner will be chosen! Congratulations on your new Kindle Fire!
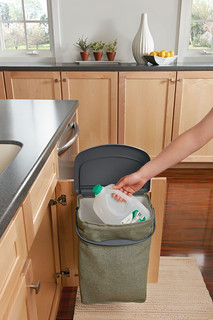
Rubermaid hidden recycler giveaway
The very simple dress tutorial
So a while ago i was going through my fabric and came across some stretch velvet I got for super cheap from a remnant box. I was trying to think what I could do with it and came up with this very easy super quick dress for Tabitha, Although it came out a little big, I forgot it stretches so I didn't need to add any give to it like I usually do. This dress took me less than two hours start to finish, and that included trying it on Tabitha and taking pictures.
What you'll need
enough streatch velvet (or any streatchy fabric) I think i had a little over a yard for a 3t.
thread, a needle for streatch fabrics, scissors, all that jazz.
Fair warning this is not a picture intensive post so I'll have to explain a lot of what i did. Sorry, next time i'll take more pictures!
First for the pattern.
1. I took a shirt of my daughters and folded it in half then traced around it on butcher paper leaving the sleeves off. See the picture below. For the front I made the neck a little lower than the back.

2. I measured where the shirt ended on my daughter and where I wanted the dress to go to. Then added that amount to the bottom of the pattern. (you can ignore the lines on my pattern i use the same pattern for a lot of different dresses)
3. fold fabric and cut out the front and the back on the fold.
4. Pin front and back together.

5. Sew front to back and side and shoulders.
6. Hem bottom of dress by folding over bottom edge 1/2 inch and sewing then folding over 1/2 inch again and sewing.
7. Measure around the entire neckline.
8. Cut a strip the length of the entire neck like +1/2 inch x 1 1/2 inches
9. pin strip front of fabric down to the outside of the dress at the neck and sew all the way around folding in and overlapping the ends slightly.


10. fold the strip over and in half so it looks like the picture below, and pin it to the inside of the dress at the neckline.
11. sew along the neck.
12. repeat steps 7-12 for each arm hole.

And your done! Super quick and easy dress.

(please excuse the abundance of Tabitha's toys in the background!)

Tabitha loves it and it was super easy to make. It is a little big on her so I may make a belt to go with it but I think its nice by its self too.

This would be a really easy dress for a beginner since there are no zippers or buttons.
Wednesday, May 23, 2012
Girls are so Much fun sign ups
Girls Are So Much Fun and
Addilyn's Turning 1 Birthday Bash Giveaway!

Brought to you by This Girl's No Expert, This Mom's No Expert, Swanky Moms Club,
Just A Marketing Mom and Confessions of a Busy Mom
Sweet little Miss Addilyn Rose, is turning 1 year old and we are looking for some crafty divas and snazzy bloggers to help us kick off her birthday with a BANG by doing a custom little girl giveaway!!
So far, our giveaway items just starting out are a custom Tutu, 8x10 Canvas Print of YOUR Photo, Copy-Kids DVD, Personalized Juppy Baby Walker, 5x7 Picture Frame, 8x10 Picture Frame, 3 Boutique Bows, Personalized Children's E-Book and a Custom Made Dress! And we are just getting started! The prize list grows by the hour!
We have TWO sign up options.
One for Crafty Divas that make handmade items
and one for Snazzy Bloggers
(and yes, there is a free sign up blogger option too)
(If you are not a crafty person but you are a blogger, scroll down to option two)
- Name: Addilyn Rose Rotenberry
- Gender: Female
- Initials: ARR
- Size: 12-18 Months
- Shoe Size: Toddler 5
- Room Decor: Pink and Brown
Examples of items could be:
- Custom made dress, Shirt, Outfit or Shoes
- Personalized Embroidered Shirt
- Embroidered or Handmade Blanket or Quilt
- Vinyl Lettering
- Picture Frames
- Bows
- Bow Holder
- Hand Painted Wall Art for Little Girl's Room
- Hand Made Toys or Toddler Items
- Embroidered Diaper Bag
- Custom Personalized Sippy Cups or snack holders
The possibilities are ENDLESS!
*We will need to receive this item by June 14th at the latest! I will email you my address upon completion of the below form in order to send your item for Addilyn to me so I can complete my amazing review of your product before the giveaway starts. You will be responsible for shipping if you are not local in Dothan, AL.
2. Donate same custom made item FOR the Givewaway
- If your item is a personalized item (example - embroidered name, etc.) you will be provided with contact info of the winner and winner will be provided with your contact information upon close of the giveaway, and the winner being chosen via Rafflecopter.) You will also be responsible for shipping.
- If your item is not personalized just send both items to me together and I will take care of mailing the items to the winner.
So you will be donating 2 items!
What do our crafty sponsors get in return for their amazing gift and giveaway donation? TONS OF EXPOSURE!!
- I will do an exclusive positive review of your product on my blog's home page and will permanently list a link to the review on my “Product and Website Reviews" page.
- In my review, I will include links to your Facebook Fan Page, Twitter, Website, eBay store, Etsy Store – any or all that you choose.
- I will include photographs of the product you send me for Addilyn in the review posting.
- I will share the review post on Facebook, Twitter and Pinterest.
- I will list your “linky button”, logo or link to your Website/Facebook/eBay store/Etsy store on the “Favorite Blogs, Sites & Products” page permanently.
- You will be listed as a sponsor in the giveaway and linked throughout the giveaway post with pictures and praises of your amazing products.
- You will be listed on the Rafflecopter giveaway form with ANY link(s) of your choosing. That's right - ANY AND ALL. No limit! This will get you tons of exposure!
Click Here for the Crafty Sponsors Sign Up Sheet
Not a crafty person but you are a snazzy blogger and want to be a part of this Giveaway?
We have a few choices so Option Two is for YOU!
Sign Up Option Two for Blogger Sponsors:
1. Donate $20 towards a Toys R Us Gift Card
($10 for Addilyn and $10 for winner)
- This will get you unlimited links of your choice on the Rafflecopter Form
2. HOST Option: Donate $12 to cover extra gift card purchases, shipping, etc.
- You will get 8 links of your choice AND will be a linked co-host of this event.
3. Donate $10 towards a Toys R Us Gift Card
($5 for Addilyn and $5 for winner)
- This will get you 5 links of your choice on the Rafflecopter Form
- You will get 2 links of your choice on the Rafflecopter Form
5. FREE Sign Up
- You will get 1Facebook Page link on the Rafflecopter Form
Note: FREE Blogger Signup Sponsors: If you refer the most bloggers, you will be able to get 5 links on the Rafflecopter form for FREE!
Click Here for the Blogger Sign Up Sheet
EVERYONE must be committed to promoting this giveaway on all giveaway sites they know of, twitter, Facebook, etc. during the giveaway. Promotion is what is going to get us exposure and followers!
This contest will be live (hopefully) from June 30th to July 30th 2012
Sign ups will end June 7th 2012
Click Here for the Crafty Sponsors Sign Up Sheet
Click Here for the Blogger Sign Up Sheet
Thank you all so much for your help!
I think this will be a lot of fun and will
be a great way to celebrate my
little Addilyn Rose turning 1!!
Please click here to copy and paste the HTML code in your own blog post in order to promote this blogger sign up:
Grab the Button For Your Sidebar!
<div align="center"><a href="http://www.thisgirlsnoexpert.com/2012/05/girls-are-so-much-fun-and-addilyn-is.html" title="Sign Up Opp: Crafty Divas & Super Bloggers Different Sign Up Options for EVERYONE! Even a free Blogger Sign Up Option! It's the Addilyn's Birthday Bash Giveaway!"><img src="https://mail.google.com/mail/ca/u/1/?ui=2&ik=df38402b05&view=att&th=137752760a2a8e37&attid=0.2&disp=thd&zw" alt="Sign Up Opp: Crafty Divas & Super Bloggers Different Sign Up Options for EVERYONE! Even a free Blogger Sign Up Option! It's the Addilyn's Birthday Bash Giveaway!" style="border:none;" /></a></div>
Subscribe to:
Posts (Atom)