I've been gone for a long time her. I kind of let this blog die in obscurity. I actually really needed to write, but I've just been so overwhelmed that i kept putting it off. So here I am. I'm back.
So much has happened in the last year and change.
* We moved from Maryland to California
* Morgen started a new job
* Tabitha started kindergarten and loves it
* Eva has started talking
* I am going back to school after a 5 year absence
* We are in the process of trying to buy a house.
Its been a crazy busy year. We are still trying to get the girls into ABA therapy, while Morgen has a great job, the insurance that comes with it is awful. I'm also working on getting Eva speech therapy through the school district, because while she has started talking she is still at about an 18 month level and she is almost 3 and a half.
I decided to go back to school this summer. I'm going to Gavalin Community College and working on a triple major in Digital Media, Marketing and Computer Science. I'm really excited about this.
I don't want to say much about buying a house just yet, but we are hoping by the end of the year.
I've been running non stop for about 2 years, and now that Tabitha has started school, I think I may really start to have time to work on some of the crafty projects I have been putting off. Tabitha picked out some cute peacock fabric and wants a poofy late 50's early 60's style dress a la Betty Draper. She also needs a bunch of church dresses, and she only wants to wear skirts and dresses for ply so I'll be working on a lot of those this summer, and hopefully getting those blogged. I am really hoping this won't be the last post for a long time, but that remains to be seen.
Teresa

Cloth diapering, co-sleeping, baby wearing, crafty mom to two girls on the autism spectrum. My adventures from everything from crafts to autism, to everything in between.
Showing posts with label sewing. Show all posts
Showing posts with label sewing. Show all posts
Tuesday, April 28, 2015
Tuesday, August 27, 2013
Long summer break
Hey ya'll! I know its been a while. We've had a long an interesting summer and I haven't had much time to myself lately. At the end of May we moved from Idaho to Maryland, leaving behind all our friends for a new journey. Its been a rough transition. Eva is taking it all in stride being only 18 months old now, but Tabitha has had a hard time. She misses her friends. I've had a rough time as well. I miss my friends. I miss having such an awesome support structure. I also really miss Rexburg. I miss the feel of it. Everyone was a member of the church, you weren't bombarded with inappropriate clothing or language everywhere you go. You didn't have to navigate the hundreds of people smoking at every exit, everywhere you go. There was also the feeling of community. Almost everyone in our complex would spend the afternoons outside chasing our kids together and helping each other out. I really miss that.
Maryland is beautiful. The trees are amazing, I love that there are little ponds everywhere. I love that there is so much historical significance to teach my kids. I love that I can take them to the smithsonian and teach and show them so many things I couldn't have back in Idaho. I have better medical care for Tabitha here. We have started the process to get Tabitha into ABA therapy and into preschool. There are so many programs that will help her that we couldn't get back in Idaho. Morgen has a great job. He just finished his training and will soon be starting actual work, which he is excited about.
I haven't had much time or a place to sew and most of my stuff is still back in Idaho in our storage unit, which is kind of a pain.
I really hope to get back to crafting, and writing soon. I pulled out a dress that I started when Tabitha was 18 months old. I will hopefully finish it soon so Eva can wear it. I have actually made a different version of this dress (its my own pattern) before and I have been wanting to write a pattern for it so you all could make one too so that is my current goal.
When we moved to Maryland from Idaho we couldn't come out first to find a place so we had to hope that we would find something good like we did when we moved to Idaho. Unfortunately it didn't work out that way. We ended up in an awful place that was dirty and starting to fall apart. We were able to move again to a much nicer place but it was a stressful move and cost all we had to make a second move.
We are trying to get settled now and will hopefully get back to our regular routine soon.

Not that this has anything to do with the post, its just a fun picture we took before leaving rexburg.
Friday, April 26, 2013
What I've been doing...
Hey guys! Sorry its been so long since I've posted. We have had a lot going on. We've been working with Tabitha to try to get her outbursts under control and are trying some aromatherapy with her that seems to help a lot. We've also been experimenting with her diet and have found some foods make her act out more than others.
This is what else we've been up to:


This is what else we've been up to:

The girls and I have been spending a lot of time together. I've been trying to get us outside as much as possible whenever its not raining.


Morgen GRADUATED from BYUI (well not technically, he still has to finish his senior project and do his internship, so he technically graduates in July but he walked this month so we wouldn't have to come back)

More playing outside. The girls each got some money from their grandpa Bob so they got new baby strollers, and they love them.

I've actually managed to get some sewing done but no tutorials. I did come up with a fun new dress that I may do a tutorial for soon, however thats it in the left corner. I wasn't paying attention and I messed up the bubble skirt so I have to take it apart and fix it.

See that pile o boxes? Its because we are MOVING! Oh my gosh moving stinks! I've been going through everything and we are selling a lot before we move. We are selling all the baby stuff except for clothes, as well as furniture, toys, and a bunch of my clothes. Our house is full of boxes and I am working hard to try to get all this ready before we move on May 25. Thats right we have one month!
Where are we moving you ask?

Thats right we are moving to Maryland!!
Why? Because Morgen got a Kick A job! Woot!!! He applied for an internship but was offered an awesome job instead and BYUI is going to count the first few months as an internship!
We are super excited but a little nervous too. I know a friend in DC and my grandfather lives in Maryland, but we don't really know anyone there. But I'm hoping it will be just as awesome as when we moved from CA to Idaho. We were nervous. We knew one other couple. But we made some amazing friends, friends I'm really sad to leave. Tabitha has some Awesome little friends and I've made some Amazing Mommy Friends who I know I will be life long friends with. So here's to new adventures! I hope I will start having more time to blog now that morgen is out of school and has pretty regular hours. My goal right now will be to blog once a week. So I hope you all stay with me!
Thursday, August 30, 2012
The Penny Jumper
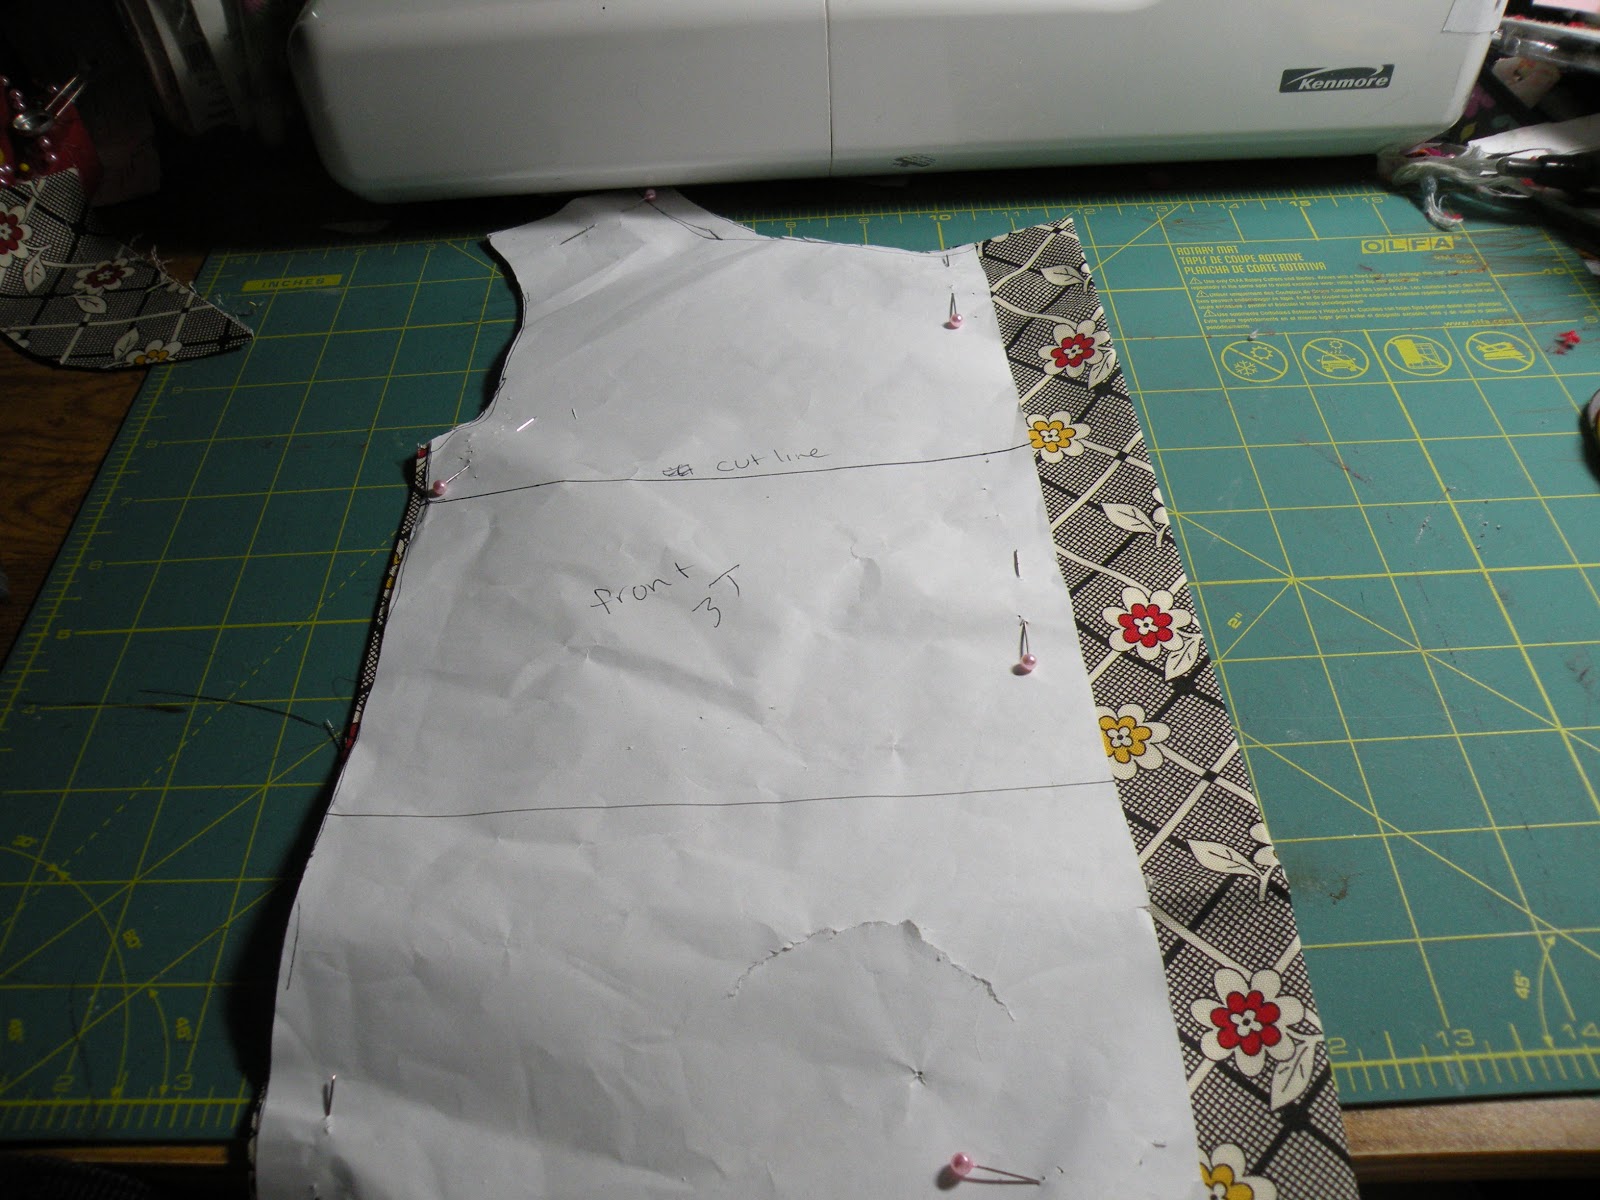
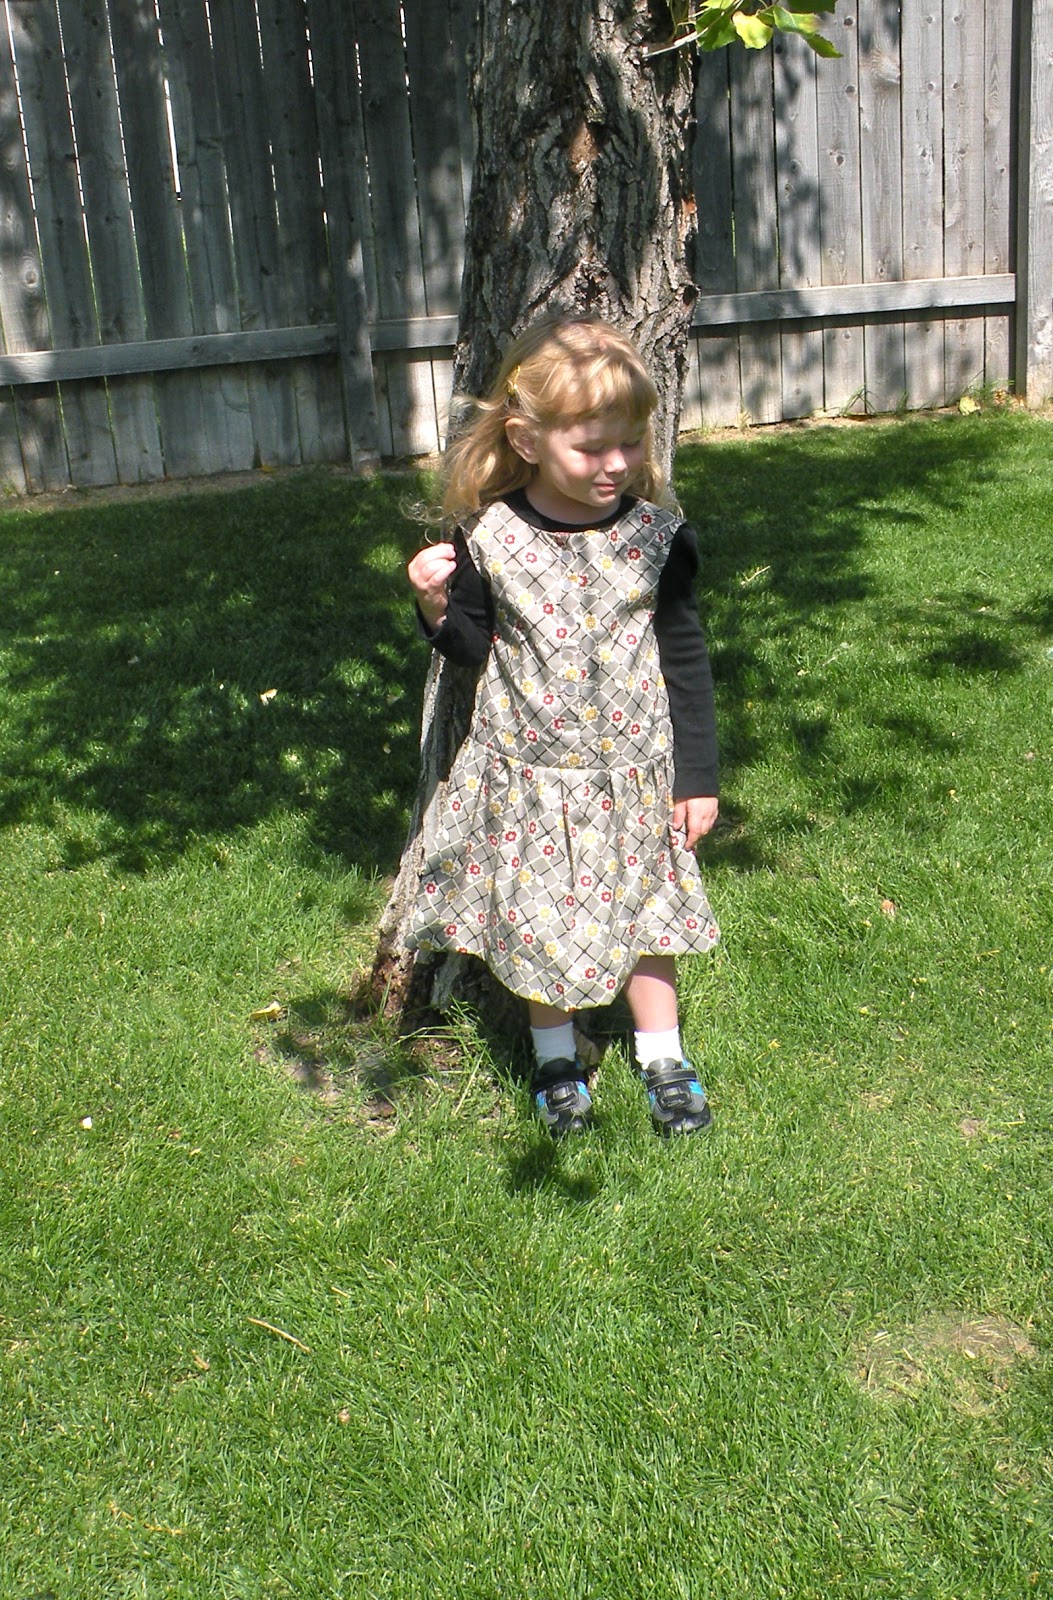
I know a lot of kids have already started school, but Tabitha doesn't start school till September 24th. So back to school sewing is just starting. She has become really into wearing dresses lately, so I'm making her a bunch of school and church dresses right now. I will do as many tutorials as I can so you can enjoy the dresses I'm making Tabitha as well. The first dress I did, was inspired by an ad I saw for Sears from 1960, it was a cute little button front jumper. I thought that would be perfect for Tabitha, since the weather will start warm and get progressively colder, I wanted something I could add layers to. So here you have the Penny Jumper. I was trying to think of a name and when looking at Tabitha in the dress all I could think was "Penny Pingleton is Permanently, Positively, Punished!" So because my brain is so full of useless movie quotes and trivia, it became the Penny Jumper.


I did Tabitha's in a size 4t, she's kind of in-between a 3t and 4t right now, and I wanted to be able to put sweaters under it to keep her warm if I need to. I also made the hem 1 inch folded twice, so that I could let it down if I need to. She is growing up not out, so having a hem I could let down is really helpful.
Supplies:
Enough Fabric for the dress and lining. I used 1 yard of outer fabric and 1/2 yard red fabric for the lining.
buttons
Ruler
scissors
cutting mat and rotary cutter if you have them.

make sure you have your Basic top pattern ready and cut out.
Don't mind the extra markings on mine, thats from a different dress.

1. Line up the pattern 1 inch from the edge of the fabric.
2. Cut 2 of the front leaving 1 inch extra out front. This will be for the button holes.

3. Cut the back on the fold. Do not add and extra fabric for the back (sorry no picture of just the back)

4. Lining. lay the pattern on the folded in half lining material. Pin leaving 1 inch (sorry bad angle of picture)
5. Cut back lining same as back fabric. On fold no extra material.

6. Pin and sew front to back at shoulders and side seams for both main and lining fabric.
7. Place lining fabric on main fabric top side together.
8. Pin main fabric to lining fabric at neck, armhole and front where buttons will be.

9. Sew main fabric to lining,

10. Turn right side out and press seams.

11. Fold one side of the front over 1 inch. Pin down

12. Sew down fold to keep it in place.

13. Decide where you want your buttons and using your machine's buttonholer add your button holes along the front.

14. Line up the two sides and sew the bottom of the front closed.

15. For the skirt, I cut a rectangle, the entire width of the fabric by 15 inches long. You will need to decide how long you want the dress. If you want to be able to let it down as your child grows, add 2 inches to the final length you want. I not add 1 inch and you will do a half inch seam.

16. Sew the rectangle into a tube at the selvage.

18. Line up the skirt seam with the middle of the back of the dress.

19. Then distribute the skirt evenly to the front and sides and pin.

20. Add pleats by folding over and pining. It depends on how much fabric you have and how close you want your pleates. I did four pleats in each section.

21. Sew your pleats.
(after this I don't have step by step pictures, sorry.)
22. Sew on the buttons to the front of the dress.
23. Hem your dress. For a dress you want to let it out later, fold up the hem 1 inch press, then fold it up another inch, press and sew it down. For a hem that you will leave, fold up the hem 1/2 inch, press, fold another 1/2 inch, press and sew.
Thats it. The dress took me about 2 hours to make not including the buttons because I did those in the morning.


I hope you enjoy the Penny Jumper, and if you have any questions feel free to ask, I'll answer as quick as I can.
Teresa
Tuesday, July 24, 2012
Summer Fun With Kids: Sew Easy Boys Wallet.
I'm Super excited to have the lovely Delia From Delia Creates here to share a fun sewing with kids tutorial today. She has an amazing blog that I check frequently and you should too!
I am so happy to be here for Teresa's Summer Fun with Kids Series.
One thing that I am trying to get better at is teaching my children how to sew. My daughter who is four months will have to wait her turn. But her two older brothers who are 3 and 7 can learn now. If you find yourself with similar desires, my project today can help!

I've come up with a VERY simple pattern for a boy's wallet. Of course, you can make it as girly as you please. For now, I'll keep it all boy since there never seems to be enough boy projects out there.

It is designed for a child between age 7 and 10 give or take. You can certainly have younger children depending on their personality and interest. It is ideal that they can use scissors with some precision.
I still was very hands on with my son Owen who is 7. He isn't as familiar with my sewing machine as he could be.
He enjoyed being my pattern tester though and he helped me work out quite a few kinks.
To get the pattern, go here and retrieve it from my google docs account.
Before you begin...
Print off the pattern.

- You may notice that the pattern I provide you is different than the pattern pictured here. This is the pattern Owen tested for me. All the differences from this pattern to yours are improvements.
- There are directions on the pattern. Referring to this picture tutorial may help your young sewer a little better though.

Step 1. Gather what you'll need for the project:


 Leave
the fourth side open for putting in money.
Leave
the fourth side open for putting in money.


 One word of caution on the faux snake skin wallet. The material is more oil cloth like than felt like.
 You'll need a smooth surface on the top and the bottom for sewing. Wrapping it in tissue paper can help. You just might need to do more trimming later as the wallet pieces may shift. I also DO NOT recommend using the snake skin with kids. It's fussy and tricky even for me as an adult.
 And...here is a peek at what the current pattern will make for you. There are two rows of stitching in the middle of the liner piece of felt. This helps the wallet close better.
 Pretty nifty...
 A fun, functional craft great for any boy.
I am so happy to be here for Teresa's Summer Fun with Kids Series.
One thing that I am trying to get better at is teaching my children how to sew. My daughter who is four months will have to wait her turn. But her two older brothers who are 3 and 7 can learn now. If you find yourself with similar desires, my project today can help!

I've come up with a VERY simple pattern for a boy's wallet. Of course, you can make it as girly as you please. For now, I'll keep it all boy since there never seems to be enough boy projects out there.

It is designed for a child between age 7 and 10 give or take. You can certainly have younger children depending on their personality and interest. It is ideal that they can use scissors with some precision.
I still was very hands on with my son Owen who is 7. He isn't as familiar with my sewing machine as he could be.
He enjoyed being my pattern tester though and he helped me work out quite a few kinks.
To get the pattern, go here and retrieve it from my google docs account.
Before you begin...
Print off the pattern.

- You may notice that the pattern I provide you is different than the pattern pictured here. This is the pattern Owen tested for me. All the differences from this pattern to yours are improvements.
- There are directions on the pattern. Referring to this picture tutorial may help your young sewer a little better though.

Step 1. Gather what you'll need for the project:
Materials:
1
sheet of craft felt *
matching
thread
Tools:
colored
pencil or washable sewing marker
scissors
sewing
machine
sewing
pins

*I found our craft felt at Hobby Lobby. They have plain felt as well as cool prints, and textures. Owen really liked the faux alligator skin in black. They also had snake skin, other animal prints, and a fun checkered flag print. My three year old, Reid, likes Cars a lot, so he decided to get the racing flag pattern.
2. Cut out your wallet pattern pieces on the black solid lines.

3.
Using the first two pattern pieces, trace around them on the craft felt. Then
cut them out.


You
should have two large rectangles and one
small one when you're done.

4.
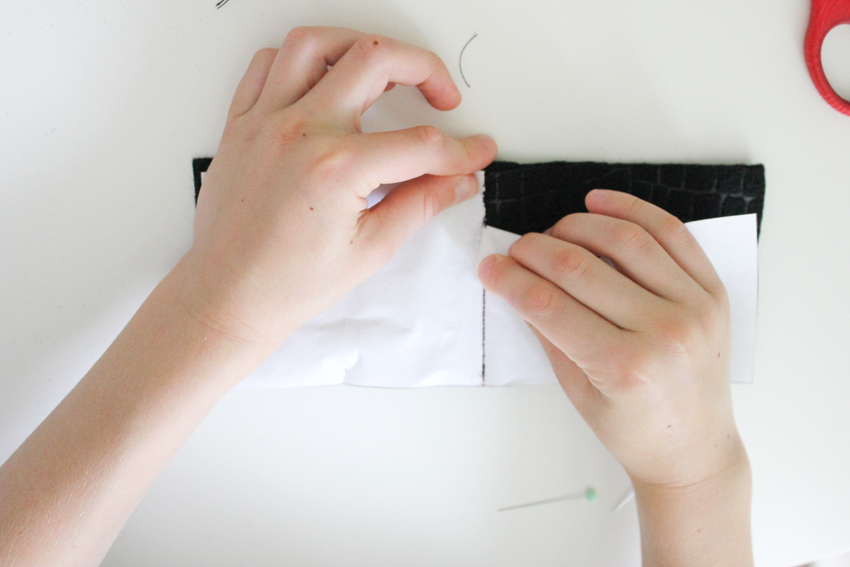
Take one of the large rectangles and the small pocket rectangle. Lay the small pocket rectangle on top of the large
one right sides facing up. Line the small one up with one side of the large
one.

5.
Now, it's time to sew!
Using
Sewing Pattern #1, lay it on top of the stack of felt rectangles you just made. Add pins if you want. (I did this for Owen)


6.
Sew down the middle twice following the red dotted lines (you only see one line here, this is one of the areas I improved later).

Pull off the paper
sewing pattern. As you rip it away, the paper will tear and the stitches will
stay.
7.
Lay your sewn stack of felt rectangles pocket side down. Now lay the second
large rectangle on top, right side facing up.

8.
Lay sewing pattern #2 on top. Following
the red
dotted lines again, sew around three sides of the rectangles.


You're done!

Now fill it with money, or Ninjago cards if that's what suits you.:)


Teresa, thank you so much for having me over, and thank you for giving me the motivation to do more projects like this with my kids!
Subscribe to:
Posts (Atom)
LinkWithin
