Showing posts with label guest post. Show all posts

Friday, April 26, 2013

Interactive plush pals review

I don't know about your kids, but mine LOVE music. Tabitha sings all day and loves to listen to music. So I was excited to have the opportunity to try the Interactive Plush Pal Freddie Frog from Viatek. These cute animals are a fun new way to listen to music for kids and adults. Tabitha is a huge fan of Phineas and Ferb, so I plugged freddie into the headphone jack of my ipod and put on some music for her. The first time I tried it Tabitha was sleeping and it was just Eva up with me. Eva was freaked out and started crying, but by the next morning she was interested in it and kept trying to make it sing. Tabitha thought it was so funny to see the frog singing one of her favorite songs.

The Viatek Interactive Plush pals come in three varieties, Freddie the Frog, Patch the Dog, and Manny the Monkey. All three are adorable and sure to be a fun way for kids to listen to music. The speaker is really good quality too. You can even plug the interactive pals into your smart phone's headphone jack and watch as Freddie the frog talks for your friends!
 photo ce225a36-a8b1-47c7-a358-badd9578bf91_zps7d03778a.jpg
There are a few things I would change about this product. First its very top heavy. It falls over fairly easily. So with small kids I had to keep putting it back upright every time they touched it. Its not really a problem if you put it out of small kids reach. Also I would either like it to have a pocket to put your ipod/phone in or a longer cord. The Cord is not very long and as we were trying to let my 3 year old play with it, the 1 year old kept grabbing the cord and pulling the ipod away. It would be nice to be able to put your ipod/phone in a pocket on the back so that there were no cords hanging out to get caught up on. The cord issue aside I think this is a really fun toy and we will definitely be using it for our daughter when she wants to listen to music in the future.
Freddie the frog back photo DSCN3106_zps94868521.jpg
The Interactive pets take 3 AAA batteries which are not included and retails for $39.99.
I received the Viatek Interactive Pal Freddie the Frog for the purpose of reviewing this toy and all views are my own.
This post was originally featured on Mommygaga.com as a guest post.

Thursday, August 09, 2012

Guest post at Green Grandma

Hey guys! I'm guest posting today over at Green Grandma. If you've been active on my facebook page lately you'll likely have seen my link to the petition to get the Idaho legislature to draft a bill that protects breast feeding moms. I personally have been deeply affected by the lack of support breast feeding moms in Idaho face. Please go read my article on Green Grandma and sign the petition on the bottom of the post. You can find the post here.

Tuesday, July 31, 2012

Summer Fun with Kids: Learning is FUN!

Today I'm excited to end Summer Fun With Kids with my awesome new Blog buddy CJ from Give oh Giveaway. She's been such a great help to me with redoing my blog and learning the ins and outs of giveaways. CJ and I met in a facebook group for bloggers and hit it off pretty fast! We found out we have a lot in common and I'm so happy she is here to do the final Summer Fun with Kids post!


Usually my blog consists of reviews and giveaways, but occasionally, I post something that I just feel like I have to share! Like, how to clean up your Facebook news feed, REAL mystery shopping opportunities, and now today's post of Summer fun with Kids!


My blog buddy, Teresa, over at Crafting in my Closet spent the month of July doing guest posts on her blog about fun things to do with kiddos during the summer months and Give oh Giveaway was offered a spot to post.

Before I dive in, I'd like to introduce you to one of my favorite people in the whole world! My Mom, Leta! You have already met my Dad HERE. What does she have to do with Summer Fun with Kids? 

Well she is the children's librarian at her local library and has had not just the summer reading program going for the kids, adults, and teens, but also a program for babies,  AND she does fun activities/crafts with them all the time. She is the definition of fun with kids....seriously. Ok so let me show you what she did for summer fun this week at her library. We attended the Super Science Summer Day that she organized and had a blast! You could do all of these things at home! 


Who says you can't have fun in summer WHILE learning? (Not my Mom!)

*The first station we went to was a blowing up balloon station....doesn't sound too scientific... until you see it! The girls were each given a empty water bottle. The adult filled it 1/3 way full of white vinegar. Then inside a balloon they used a funnel to put in some baking soda. They carefully attached it to the lip of the water bottle and then were asked to make a hypothesis of what would happen. Then on the count of 3 they lifted up their balloon (to empty the baking soda into the bottle and the balloon started blowing up itself! They made it a race and the girls were cheering their balloons on. It was so fun! The volunteer described why and how it works. For more details, instructions, and a video you can go to HERE.

#1
#2
#3
#4

*The next thing we did was take a half of a bar of Ivory Soap and put it in the microwave for 1 minute. The kids were asked what they thought would happen. I guessed it would melt....but I was wrong....This was SO SO SO COOL! You can kind of see it in the microwave there....it grew! Oh it was so fun to watch it grow. Then once it cooled off (30 seconds) it was soap flakes! It was so fun to play with and it smelled awesome! 


*The third station we visited was super fun too! We were making elephant toothpaste. This experiment included ammonia, dish soap hydrogen peroxide, and yeast. Definitely required adult supervision! I missed the exact measurements but you can check out the details HERE and watch a video. Once you add the yeast to the other ingredients it turns into an awesome foam....this lovely volunteer tinted this batch green! It was just cool to watch. The kids were hands on and this awesome lady even explained the reaction, I don't remember it, but it was cool to see!


I was in love with the 4th station! My Mom had taken an old window, filled it with metal shavings, and then taped on a heavy duty something on the back ( I should have looked!) On the ends of pencils she glued a magnet. So when you went over the glass the magnet picked up the little pieces. It was so fun to play with. We would have stayed at that station for longer if there wouldn't have been 130 other people there waiting for their turn! I plan on doing this in a picture frame and keeping them in the van for long trips or taking them to the doctors office with me when we are stuck waiting for a bit. 


It is hard to tell from this picture but she filled a vase half full with water. She put paperclips in the bottom of the vase and then children could use a u shaped magnet to try to get the paper clips out without putting their hand in the water. It took my girls a couple of tries before they figured out to just leave the magnet tight to the glass and the paperclips will follow it.

She had also glued little magnets to the ends of some cars. The girls loved having a "train" of cars to play with. The head librarian told me a little story. She said that there was a question on a pop quiz that said, what is something that starts with the letter M that picks up a lot of things....the number one answer- Mom! LOL!

We also made homemade bouncy balls, (didn't bounce so good, but it was fun!) played with Cloud Dough, made POM shooters and decorated sugar cookies! YUM!


Perhaps my 18 month old's favorite was the colored rice. I am still not sure how she colored the rice, but it was so fun! She had toys in there to scoop with and things were hidden....so they could treasure hunt! 


These are all super fun things that you can do with your kiddos this summer! We are huge fans of Science Bob at out house. He has some really fun experiments! Give some a try and leave a comment here telling me how your science experiments went over! 

Thursday, July 26, 2012

Summer Fun With Kids: Letterboxing

I'm really excited to have Monica, from Monica's Mom Musings here today to share a fun post for the Summer Fun with Kids Series.


Monica's Mom MusingsMonica is a SAHM to four children ranging in age from toddler to teen. She lives in CT with her husband of 12 years. Monica blogs over at Monica's Mom Musings about her thoughts on parenting. She also shares the struggles of each of these different stages of childhood (toddlers, preschoolers, preteens, and teens) and works really hard to keep everyone entertained. Not always an easy task with such a huge age gap and capabilities of each of her children.


  Letterboxing? What is that? When letters fight each other? Or maybe capturing letters in boxes? I know when I first heard of this I was curious about it. What it is though is a wonderful past time which combines navigational skills with rubber stamps. Basically, you go out into the world (most likely the woods) and search for boxes with the given clues and then you stamp a log book when you have found it.

My First Time

The first time I did this was with a friend a few years ago. We had gone to a local state park for some swimming and fishing. She was very into Letterboxing and had found out that there was a letterbox in this state park. So after we spent some time swimming we went for a hike into the woods. In our flip flops mind you not realizing that we were going to be taken on a trek up a mountain and through some very precarious situations. I remember thinking at the time I'm glad my son (who wasn't even 2 yet and still very unsure on his feet) stayed with my husband and went fishing because pushing the stroller would have been next to impossible. We came stumbling out of the woods filthy, physically exhausted, bug bitten, but proud. Proud because we had accomplished something we didn't think we could when we were about halfway through this excursion. And let me just clarify, that this particular letterbox was one of the harder ones. Usually people mark the difficulty in finding the boxes, but this one didn't say.

What You Need To Letterbox

There are a few things you should have with you when you go letterboxing. Before you start you need to know where to find the letterboxes to begin with. So check the letterboxing website for that. Once you have that here's a list of other helpful tools when letterboxing:
  • A book to put stamps in.
  • A pen to write notes under the stamps
  • A compass (sometimes you are given directional coordinates to follow)
  • Your camera because you are sure to find something beautiful along the way that you need to take a picture of
  • An ink pad
  • Your own stamp
  • A small bag to carry all of this in
I do not yet have my own stamp for letterboxing. Even though I had done this with my middle daughter and my girlfriend a few years ago I haven't been able to convince anyone else to try it with me so we haven't done letterboxes regularly. However, when I was invited to be a part of this summer fun with kids, I knew that I had to do letterboxing and I had to do it on our vacation this past week. So when I did it this time we just wrote in the log books who we were and where we were from. I think my new project for this week is going to be to find my instructions on how to make my own rubber stamp and create something with the family because in spite of their apprehension to try this last week, they had a lot of fun with it and want to do more. So we need a stamp.

Letterboxing In New Hampshire

So last Thursday we had a nice sunny day that was a little too cool to go swimming. So armed with our sneakers and our clues we headed out to a letterbox. This one only had one box. Some will have more boxes for you to find or mini boxes with a final box at the end that has a log book, but since everyone was hesitant about this to begin with I wanted to go easy.

Woods Walk Letterbox

I scoured the letterboxing site for something local to where we were staying that said it was going to be easy to do. After all we were trekking into the woods with a 17 month old and a 4 year old. I found the perfect one which even instructed us to check out this look out before we actually started.
Lookout at the canoe launch for the Woods Walk Letterbox.
 We began our trek through the woods. Over the bridge and through the woods a letterboxing we go...
It did end up being a longer walk that I anticipated it would be, but it was a relatively easy walk and everything was panning out as it was saying it would including this hand lettered sign
"Welcome to Nature's Cove"...
And just beyond this point was the final clue and hidden in the trees was this box...
Inside was a stamp and a log book along with a stamp pad so we were able to place the stamp on our note paper. On the top of the box it says:
THIS IS NOT TRASH! You have found the woods walk letterbox. Please do not destroy any of the contents and replace where found hidden from view. Learn more at letterboxing.org.
Most letterboxes you will find in a Tupperware container like this. Best way to keep them protected from the elements. While we were in this spot on the trail we also got a chance to explore the river a little more.
 

Denmark Memorial Fitness Trail

The very next day was another cool day and since everyone enjoyed letterboxing the day before so much we did it again. This time I found one that had 5 boxes. Four mini boxes and then the final box had the log book. This one was on a fitness trail... [caption id="attachment_1267" align="aligncenter" width="300" caption="13 year old and 4 year old ready to start"]
 We even got to do some exercising on this letterbox.

Shortly after this we found the first mini letterbox...We only ended up finding one more mini letterbox. Two of them were missing which is very frustrating, but when we got to the final letterbox that had a log book we found that we weren't the only ones who had trouble finding the other mini letterboxes. It happens. But here were our stamps from all of the letterboxes we did while we were in New Hampshire last week...
"Stamps from New Hampshire Letterboxing"

 Writing around them like this so you know when and where they were found help to keep everything remembered. What a great memento we have now from our vacation and the best part is this was completely free to do. It doesn't get much better than that. Oh and in case you were wondering how my 17 month old did, well I wore her on a baby carrier for both of these. So there was no struggling with strollers or a toddler who would have had a difficult time walking along the trail. It was a wonderful time. Are you ready to give letterboxing a try?

Tuesday, July 24, 2012

Summer Fun With Kids: Sew Easy Boys Wallet.

I'm Super excited to have the lovely Delia From Delia Creates here to share a fun sewing with kids tutorial today. She has an amazing blog that I check frequently and you should too!

I am so happy to be here for Teresa's Summer Fun with Kids Series.

One thing that I am trying to get better at is teaching my children how to sew. My daughter who is four months will have to wait her turn. But her two older brothers who are 3 and 7 can learn now. If you find yourself with similar desires, my project today can help!

I've come up with a VERY simple pattern for a boy's wallet. Of course, you can make it as girly as you please. For now, I'll keep it all boy since there never seems to be enough boy projects out there.


It is designed for a child between age 7 and 10 give or take. You can certainly have younger children depending on their personality and interest. It is ideal that they can use scissors with some precision.

I still was very hands on with my son Owen who is 7. He isn't as familiar with my sewing machine as he could be.

He enjoyed being my pattern tester though and he helped me work out quite a few kinks.

To get the pattern, go here and retrieve it from my google docs account.

Before you begin...

Print off the pattern.


- You may notice that the pattern I provide you is different than the pattern pictured here. This is the pattern Owen tested for me. All the differences from this pattern to yours are improvements.

- There are directions on the pattern. Referring to this picture tutorial may help your young sewer a little better though.

Step 1. Gather what you'll need for the project:


Materials:
1 sheet of craft felt *
matching thread

Tools:
colored pencil or washable sewing marker
scissors
sewing machine
sewing pins

*I found our craft felt at Hobby Lobby. They have plain felt as well as cool prints, and textures. Owen really liked the faux alligator skin in black. They also had snake skin, other animal prints, and a fun checkered flag print. My three year old, Reid, likes Cars a lot, so he decided to get the racing flag pattern.

2. Cut out your wallet pattern pieces on the black solid lines.

3. Using the first two pattern pieces, trace around them on the craft felt. Then cut them out.


You should have two  large rectangles and one small one when you're done.


4. Take one of the large rectangles and the small pocket rectangle.  Lay the small pocket rectangle on top of the large one right sides facing up. Line the small one up with one side of the large one.

5. Now, it's time to sew!
Using Sewing Pattern #1, lay it on top of the stack of felt rectangles you just made. Add pins if you want. (I did this for Owen)


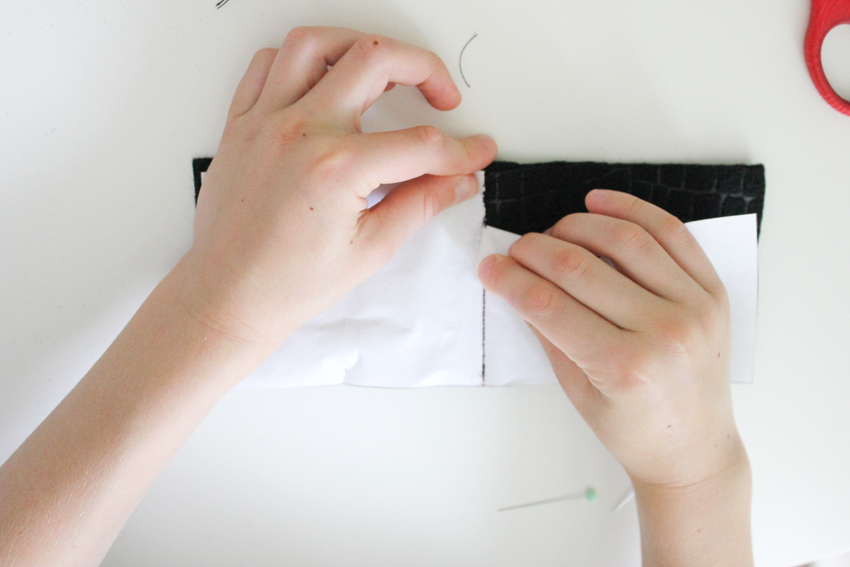
6. Sew down the middle twice following the red dotted lines (you only see one line here, this is one of the areas I improved later).

 Pull off the paper sewing pattern. As you rip it away, the paper will tear and the stitches will stay.

7. Lay your sewn stack of felt rectangles pocket side down. Now lay the second large rectangle on top, right side facing up. 


8. Lay sewing pattern #2 on top. Following the red dotted lines again, sew around three sides of the rectangles.
Leave the fourth side open for putting in money.

You're done!

Now fill it with money, or Ninjago cards if that's what suits you.:)
One word of caution on the faux snake skin wallet. The material is more oil cloth like than felt like.

You'll need a smooth surface on the top and the bottom for sewing. Wrapping it in tissue paper can help. You just might need to do more trimming later as the wallet pieces may shift. I also DO NOT recommend using the snake skin with kids. It's fussy and tricky even for me as an adult.

And...here is a peek at what the current pattern will make for you. There are two rows of stitching in the middle of the liner piece of felt. This helps the wallet close better.
 Pretty nifty...
 A fun, functional craft great for any boy.

Teresa, thank you so much for having me over, and thank you for giving me the motivation to do more projects like this with my kids!

LinkWithin

Blog Widget by LinkWithin